Grid workflow
Grid screening acquires an SEM and a FIB overview of every grid in the holder in one run, so that the grids worth a session can be chosen before any lamella work starts.
By the end of this page the experiment has a named record for every grid in the holder, each grid has an SEM and a FIB overview, and the grids have a verdict, a note and a screening report.
Before you start
- An experiment open. A new experiment’s protocol already has the two grid tasks this page uses.
- A calibrated holder. On a fixed holder, calibrate each slot on the Sample holder page. On an Arctis, calibrate the compustage’s working slot once, as below.
- On an Arctis, grids in the magazine and the magazine scanned, on the Sample tab. A scan takes about 10 minutes with the magazine shut. After the magazine is undocked its slots read as unknown until the next scan.
The examples on this page are on the simulated Arctis, with three grids in the magazine.
The Arctis working slot
The autoloader puts every grid in the same place: the compustage’s working slot. Until it is calibrated, the working slot is the stage origin, and a loaded grid sits off the origin in x, y and z, out of coincidence. Grid tasks centre their overviews on the working slot, so calibrate it once per instrument: on the Sample tab, press the pencil on the holder panel and step through to the working slot.
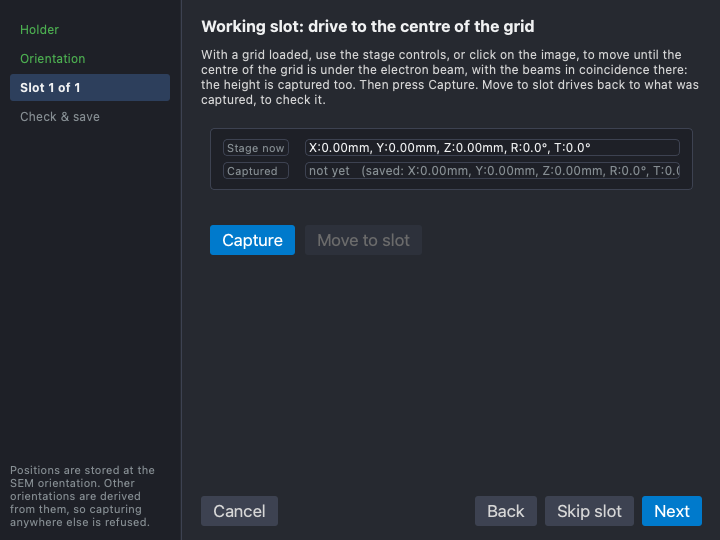
With a grid loaded, drive the stage until the centre of the grid is under the electron beam with the beams in coincidence there, then press Capture. The height is captured as well as x and y. Move to slot drives back to the captured position to check it. The calibration is saved with the microscope configuration and kept across connections.
1. Grid tasks
A lamella task is done to one lamella. A grid task is done to a whole grid: it drives to the grid’s slot and works from there. Two kinds ship:
- Beam overview: a tiled SEM or FIB overview of the grid, as the Overview tab takes by hand. One task type serves both beams; the beam is one of its settings.
- Fluorescence overview, on an instrument with an in-chamber fluorescence microscope: moves to the fluorescence microscope, inserts the objective, acquires a tiled fluorescence overview, and puts the objective back as it found it.
Grid tasks live in their own section of the protocol and are edited on the Protocol tab, under a Grid page beside the lamella tasks.
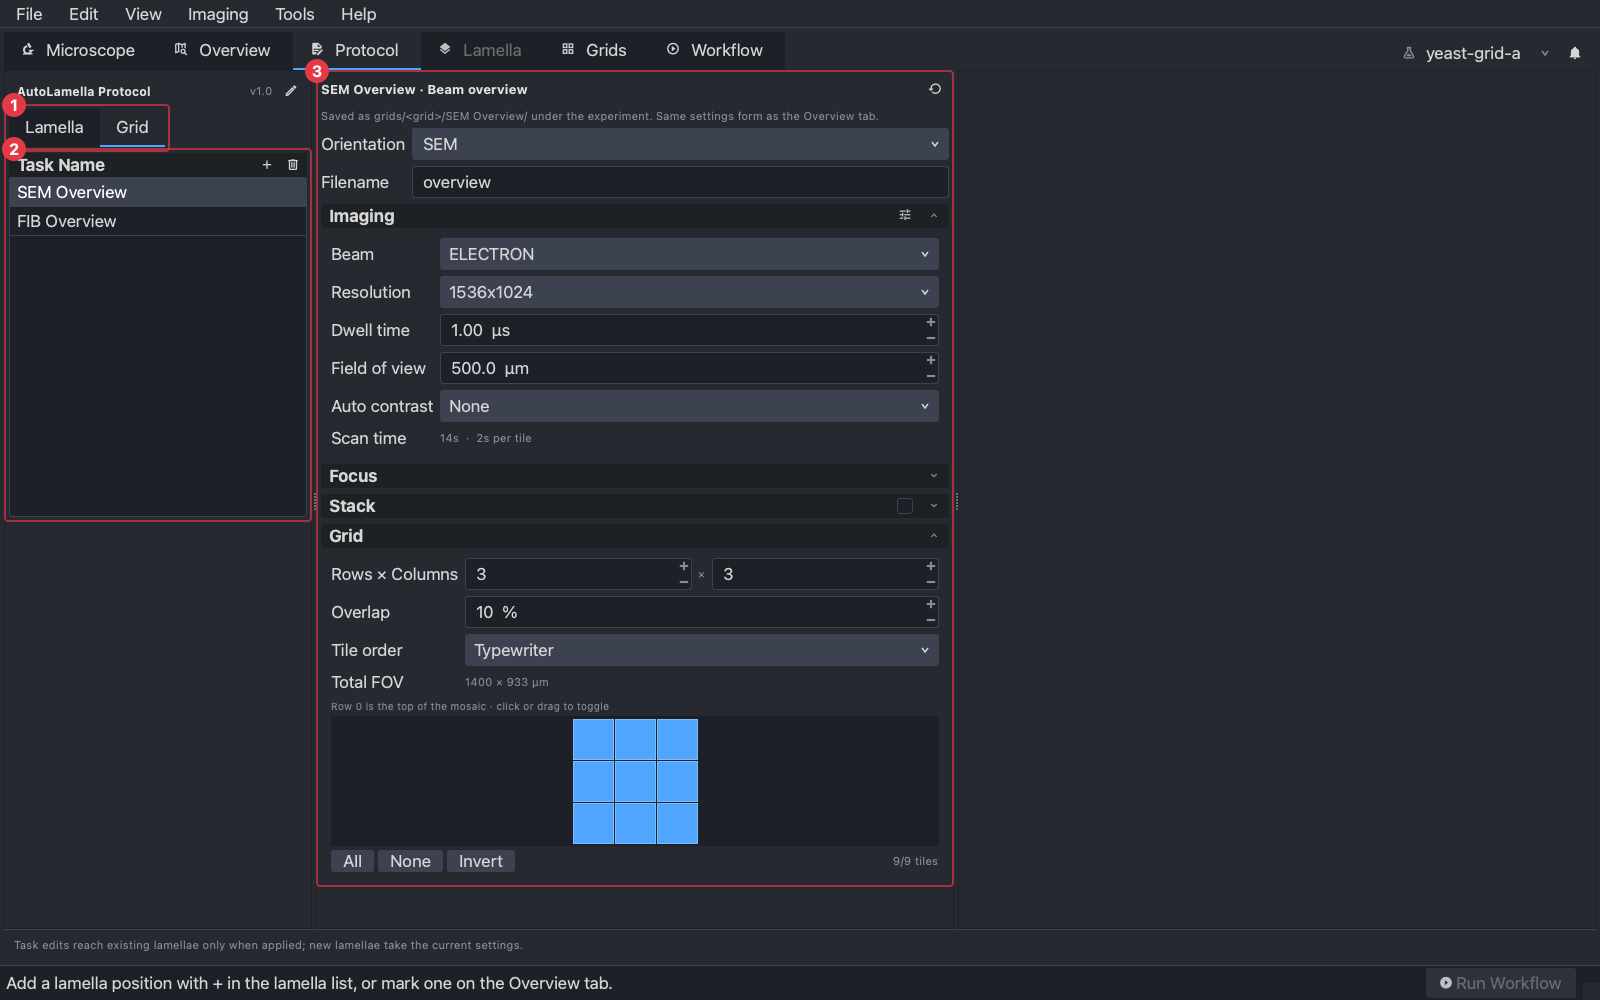
- (1) The Lamella | Grid selector. Grid shows the grid tasks, and the columns to the right follow.
- (2) The grid tasks in the protocol. + adds one: pick the type and give it a name. The name is what the task’s outputs are filed under, so keep it distinct.
- (3) The selected task’s settings. A beam overview has an orientation, a filename stem and the same tile, imaging and focus settings as the Overview tab; a fluorescence overview has channels, tile settings and a z-stack. Edits save to the protocol as they are made.
A new experiment’s protocol has two grid tasks:
| Task | Beam | Orientation | Tiles | Field of view per tile |
|---|---|---|---|---|
| SEM Overview | Electron | SEM | 3 x 3 | 500 µm |
| FIB Overview | Ion | FIB | 5 x 5 | 250 µm |
Both are at 1536 x 1024 with 10 % overlap and no autofocus, and neither depends on the other. There is no fluorescence overview; add one with + on an instrument that has a fluorescence microscope.
Stage reach
An overview is acquired around its grid’s slot, and every tile centre has to be within the stage’s travel. On an Arctis the compustage travels ±377.8 µm in y about the working slot, so the number of rows is usually the limit. A tile’s height is its field of view x 1024 / 1536 at the default resolution; at a square resolution each row is taller and fewer fit. The shipped tasks are sized to fit.
When an overview reaches past the stage, the Grid page says so under the task’s title as the overview is sized. Here the SEM overview is set to 4 x 4:
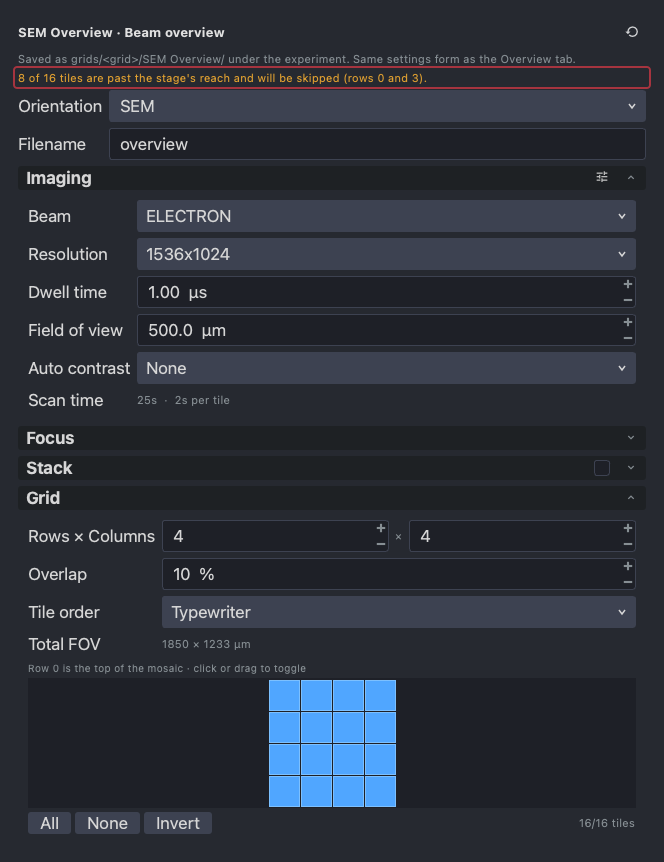
A run acquires the tiles in reach and skips the rest. The run’s history, the Grids tab’s results and the screening report name the skipped tiles.
2. Grid records
The Grids tab, between Lamella and Workflow, holds the experiment’s grid records: one card per grid the experiment knows about, with the grid’s results beside it.
A new experiment has no records. The refresh button under the cards reads what the hardware holds and adds a record for every grid it finds. On an Arctis that is what the autoloader found at its last magazine scan; the refresh does not scan the magazine. On a fixed holder it is the slots marked occupied.
Naming
Name the grids before their first run. A grid’s name is the name of its
folder, grids/<grid>/, and is written into every image it records, so
it is fixed once the grid has run: Rename… is greyed out from then on,
with the reason in its tooltip. A correction after a run goes in the
grid’s note.
Each card has a menu:
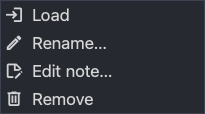
- Load and Unload, on an Arctis, bring the grid into the working slot or send it back to the magazine.
- Rename… names the grid.
- Edit note… records what was seen; see Verdict and note.
- Remove stops tracking the grid. Its files are kept.
Naming a grid on the Sample tab, in a magazine slot or a shuttle slot, renames its record in the same way, and is refused once the grid has run.
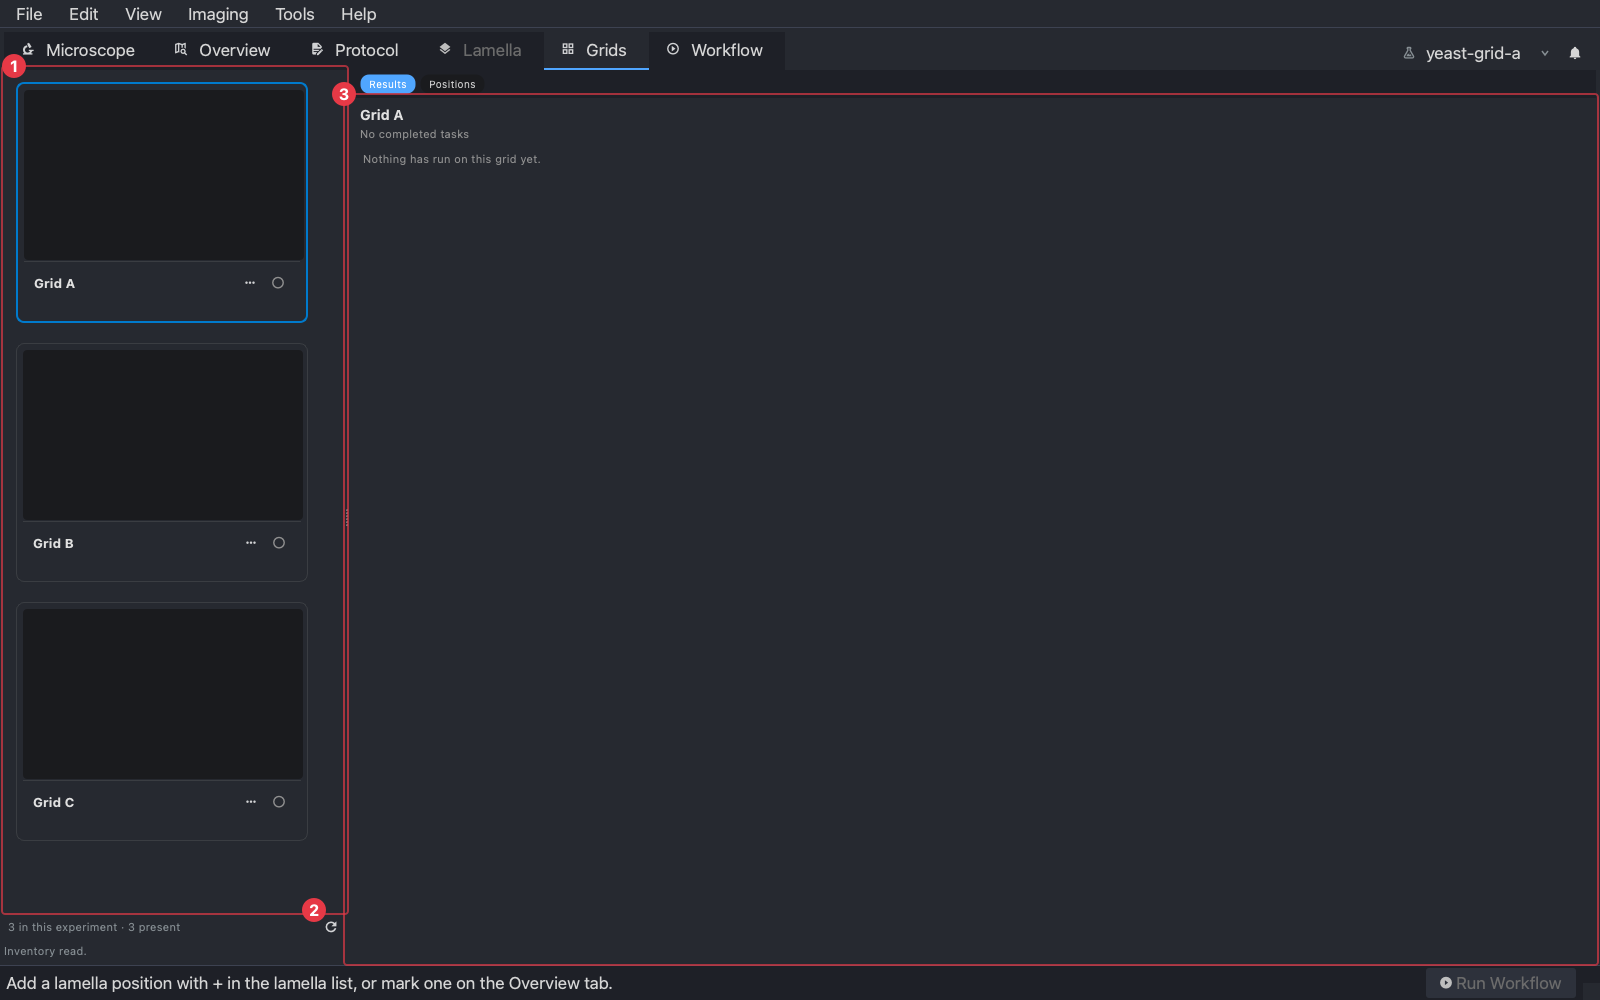
- (1) One card per grid. The line under the name is the grid’s status: the last task completed on it, empty until something has run. A grid in the beam carries a Loaded chip, and one the hardware no longer reports carries not present. The icon beside the name is the grid’s verdict.
- (2) The refresh, to run again whenever grids have changed.
- (3) The selected grid’s results. Nothing has run yet, so there are none.
A record keeps its name and history when the grid is taken out of the instrument; the card reads not present until it is back.
3. Running the grid tasks
The Workflow tab has a second view beside Lamella: Grids. It is the grid counterpart of the lamella run: pick grids, pick tasks, press Run.
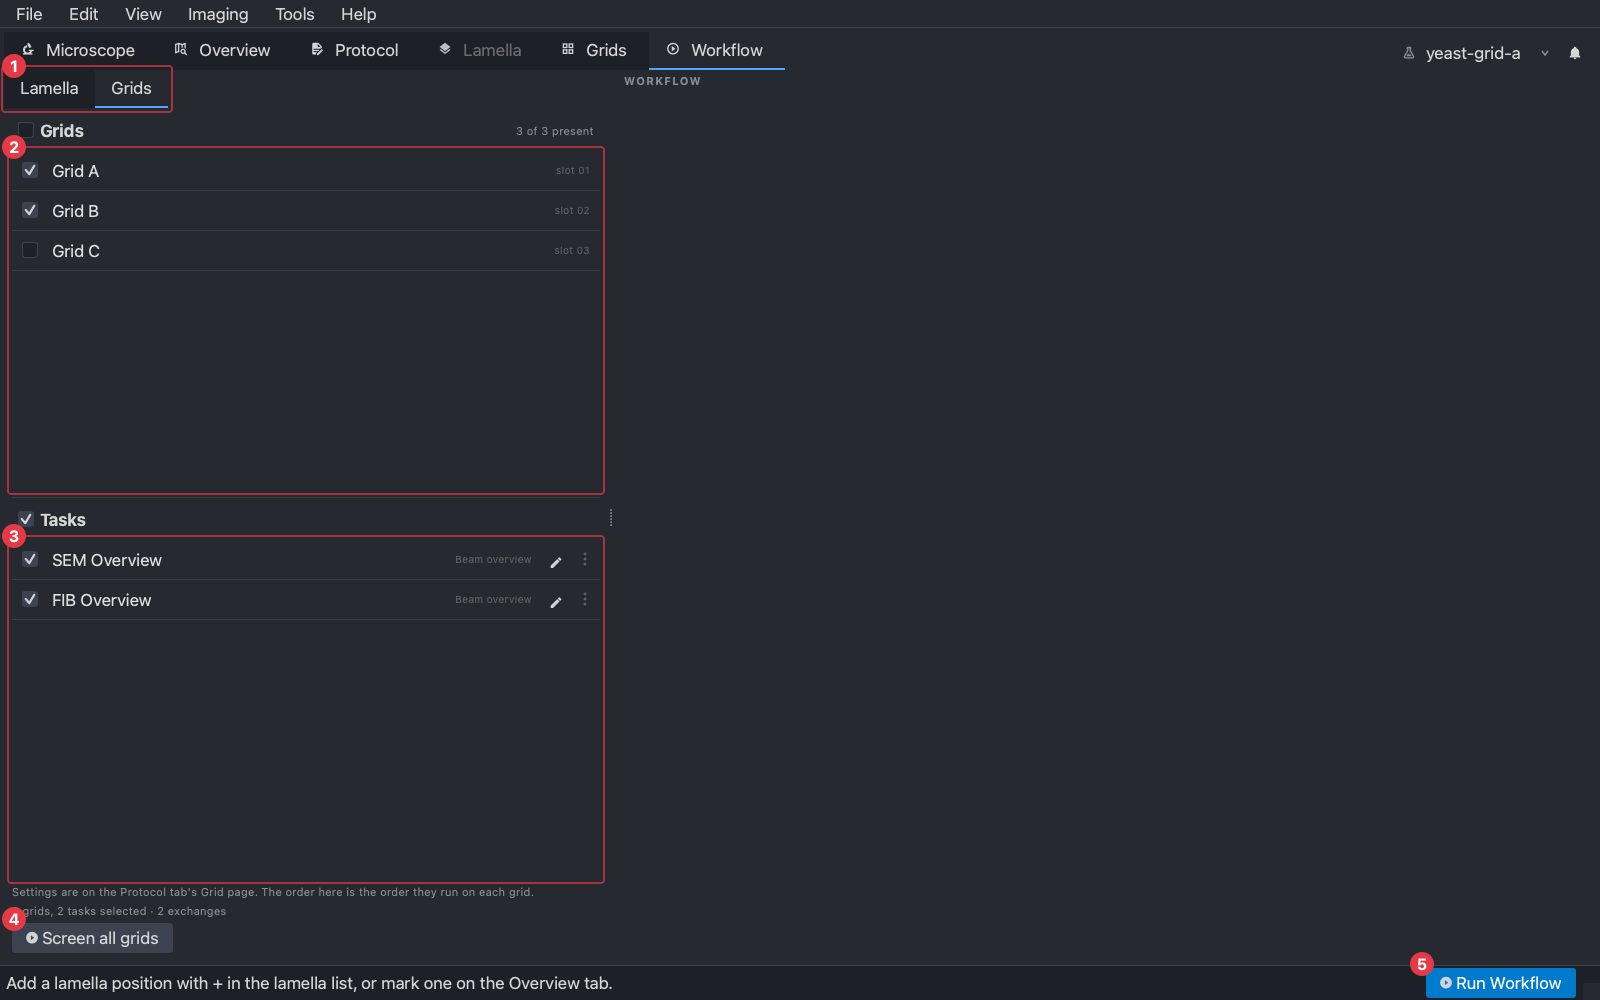
- (1) The Lamella | Grids selector. Run acts on whichever view is showing.
- (2) The grids, each with its slot and whether it is present. Tick the ones to screen.
- (3) The protocol’s grid tasks. Tick the ones to run; drag to reorder. The order here is the order they run on each grid, and it is saved back to the protocol.
- (4) Screen all grids, covered below.
- (5) Run Workflow.
The run is grid-outer: it loads the first grid, runs every ticked task on it, then moves to the next grid. The line above the buttons says how many exchanges that is. On an Arctis an exchange, unloading one grid and loading the next, takes about 3 minutes. On a fixed holder every grid is already in place, so the load step has nothing to do; each task moves the stage to the grid’s slot itself.
Run opens a preflight:
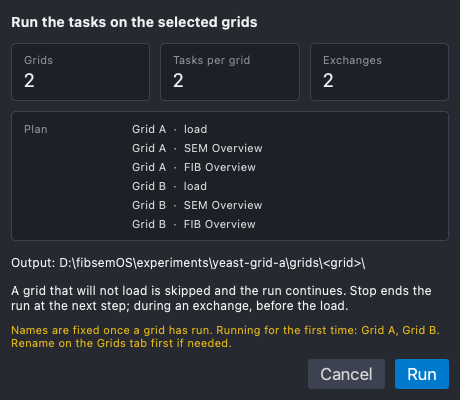
It counts the grids, tasks and exchanges, lists the plan, and says where
the files go: grids/<grid>/ under the experiment. Two rules of the run
are stated on it: a grid that will not load is skipped and the run
continues with the next, and Stop ends the run at the next step, not
mid-task. It also lists the grids running for the first time, whose names
the run fixes, and says when a beam is off; the run turns it on.
While it runs, the queue on the right shows each grid as an item, with its load and its tasks as steps:
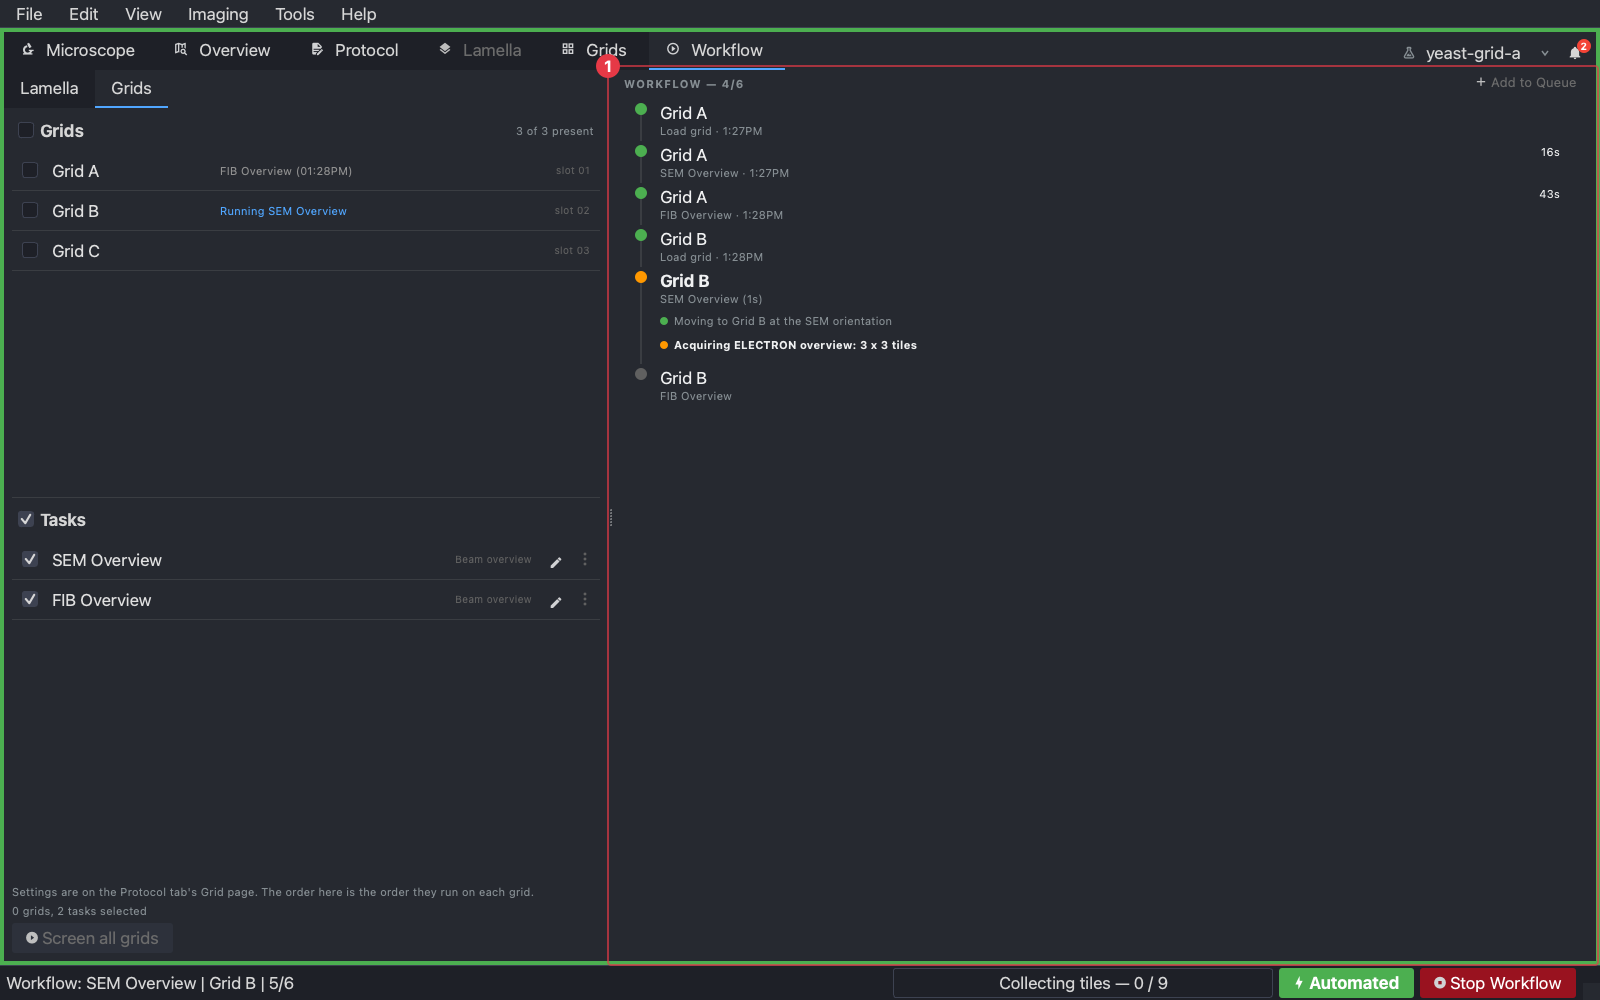
The load is a step of its own, so an exchange that fails is visible as such. While a run is going, Add to Queue → Add to End of Queue adds more grids to it. A change to a task’s settings applies to the grids not yet run, and a task removed from the protocol is skipped on them.
When the run ends, the summary lists each grid, each task, and how it went. The last grid stays loaded.
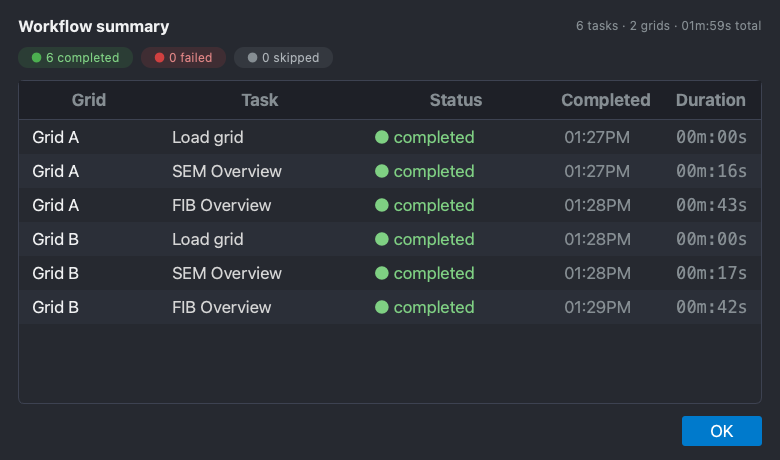
Starting a run clears the ticks in the Grids view, so the next run starts from a fresh selection.
Screen all grids
Screen all grids is the one-button version. It refreshes the inventory, adds a record for every grid found, and runs the ticked tasks on all of them, exchanging grids as it goes. On an Arctis the inventory is the autoloader’s last magazine scan, so scan the magazine first; a grid in a slot that has not been scanned is not screened.
The same preflight opens first. It lists the grids the experiment already has; a grid that only the inventory finds is added when the run starts.
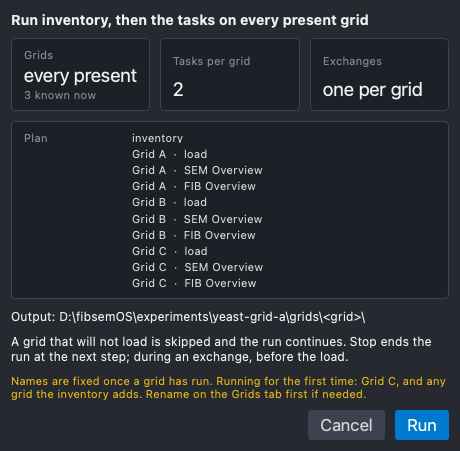
On a fixed holder it is the same run with no exchanges.
4. Reviewing the results
Back on the Grids tab, each card carries the thumbnail of its latest overview and the name of the last task that completed on it. Select a card to see its history.
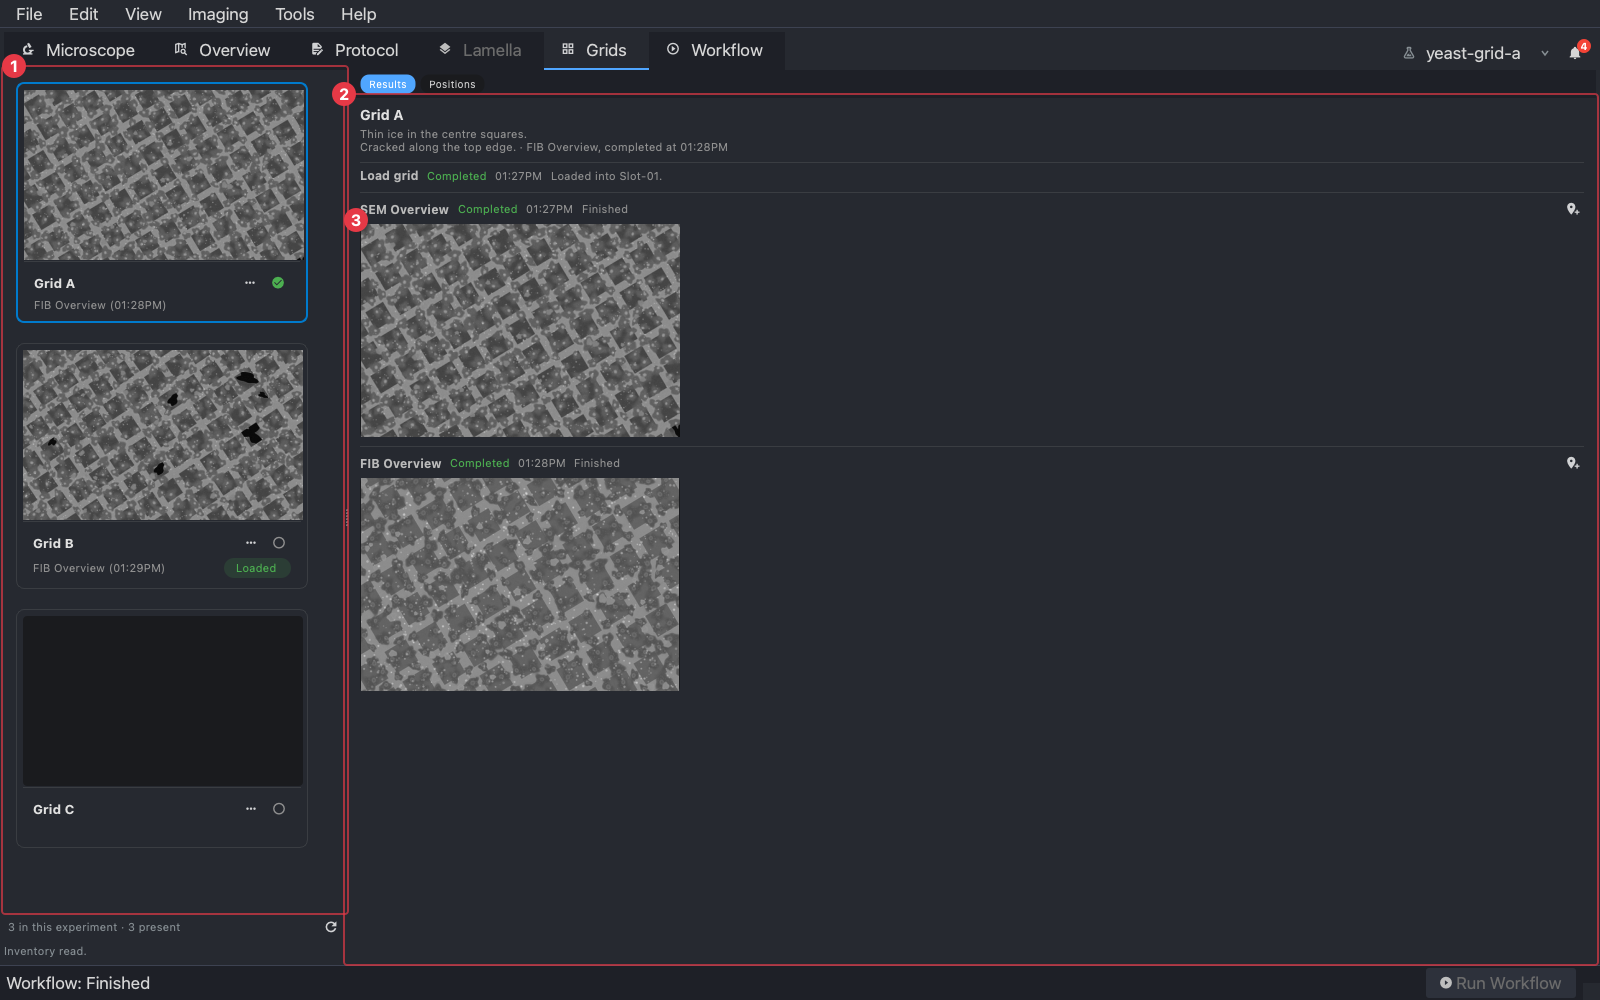
- (1) The cards, each with its latest overview and its verdict.
- (2) The selected grid’s history: every load and task, with its outcome and the time it ran. An overview that skipped tiles past the stage’s reach names them here.
- (3) The image a task recorded. Click it to open the overview at full size, with a scale bar.
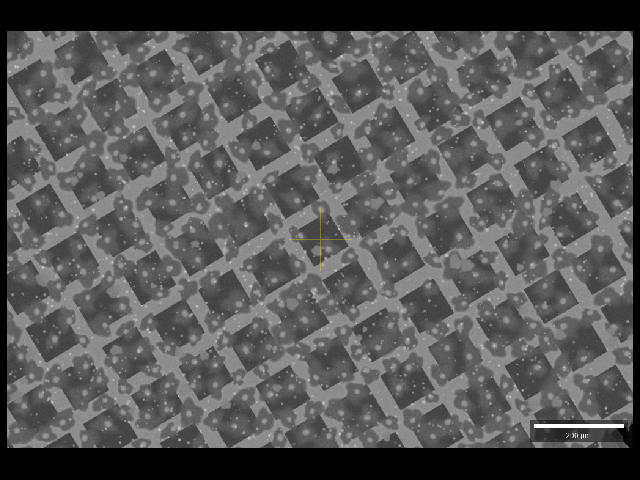
The files are under grids/<grid>/<task>/ in the experiment folder, as
the preflight said: the stitched overview, and a thumbnail beside it.
Verdict and note
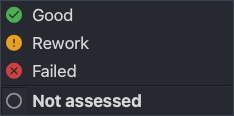
The icon beside a grid’s name is its verdict: Good, Rework, Failed or Not assessed. A person sets it, from the icon; no task does, and the record keeps who set it.
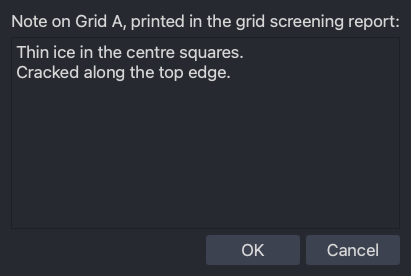
Edit note… on the card’s menu records what was seen, in words. The note shows in the card’s tooltip and in the report.
The screening report
Tools → Reporting → Generate Grid Screening Report writes
grid-screening-report.pdf to the experiment folder and opens it. It
needs the reporting extra (pip install fibsem-os[reporting]).
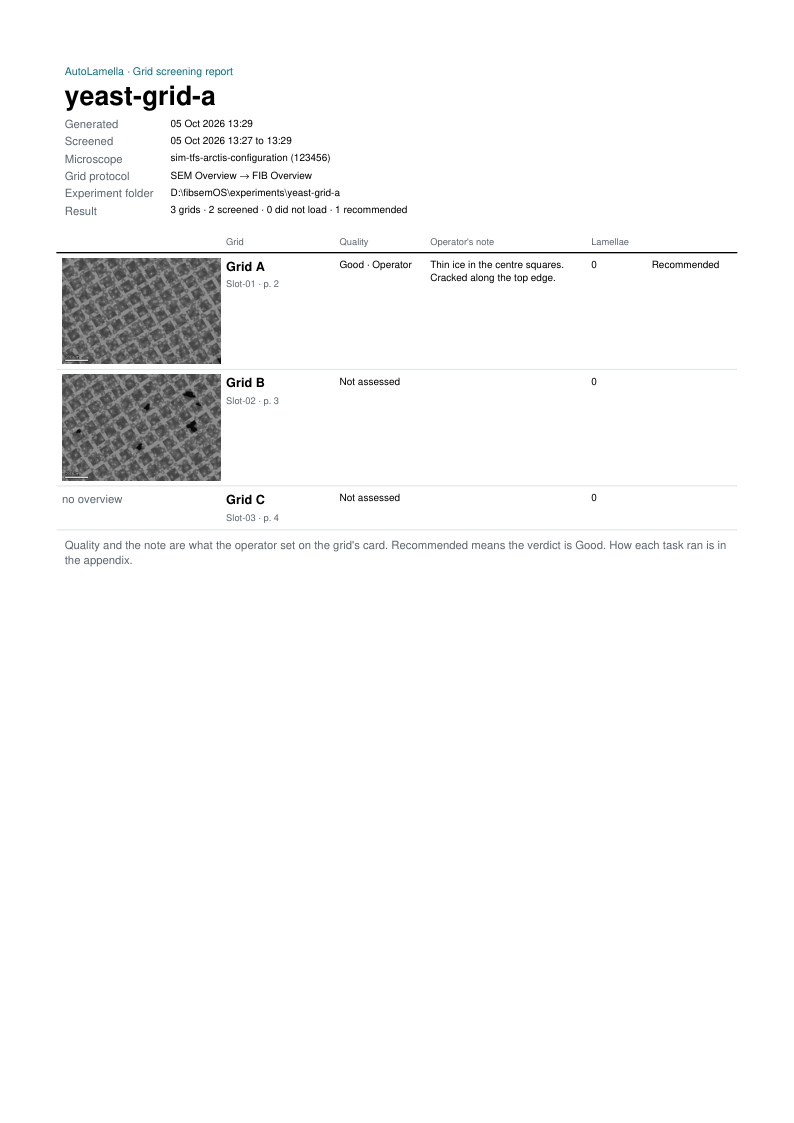
The cover names the grid protocol, lists every grid with its slot, verdict and note, and counts the grids screened, the ones that did not load, and the ones recommended: those with a verdict of Good.
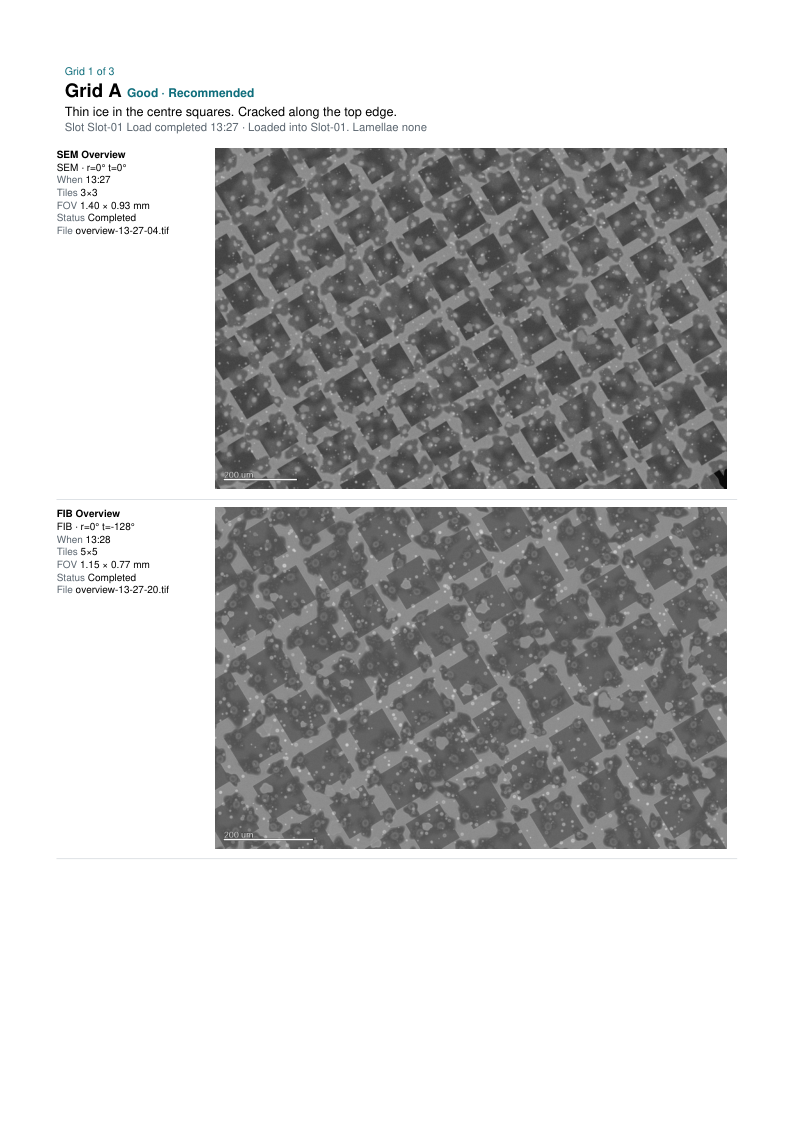
Each grid then has a page with its overviews, and an appendix at the end says how each task ran:
5. Where this fits
Screening comes before anything on the lamella pages: overview every grid first, then choose which grids are worth the session. On the Grids tab, the Positions view shows a grid’s overviews, and a lamella position marked there belongs to that grid. A lamella run refuses a lamella whose grid is not on the stage, and names the grid. Milling the positions is the lamella workflow, from Overview acquisition onward.