Workflows
By the end of this page you have run tasks on lamellae, answered a supervised task’s questions, and know how to pause, stop and pick up again.
Before you start
- An experiment with lamella positions marked, and a protocol whose tasks you have looked over.
1. The Workflow tab
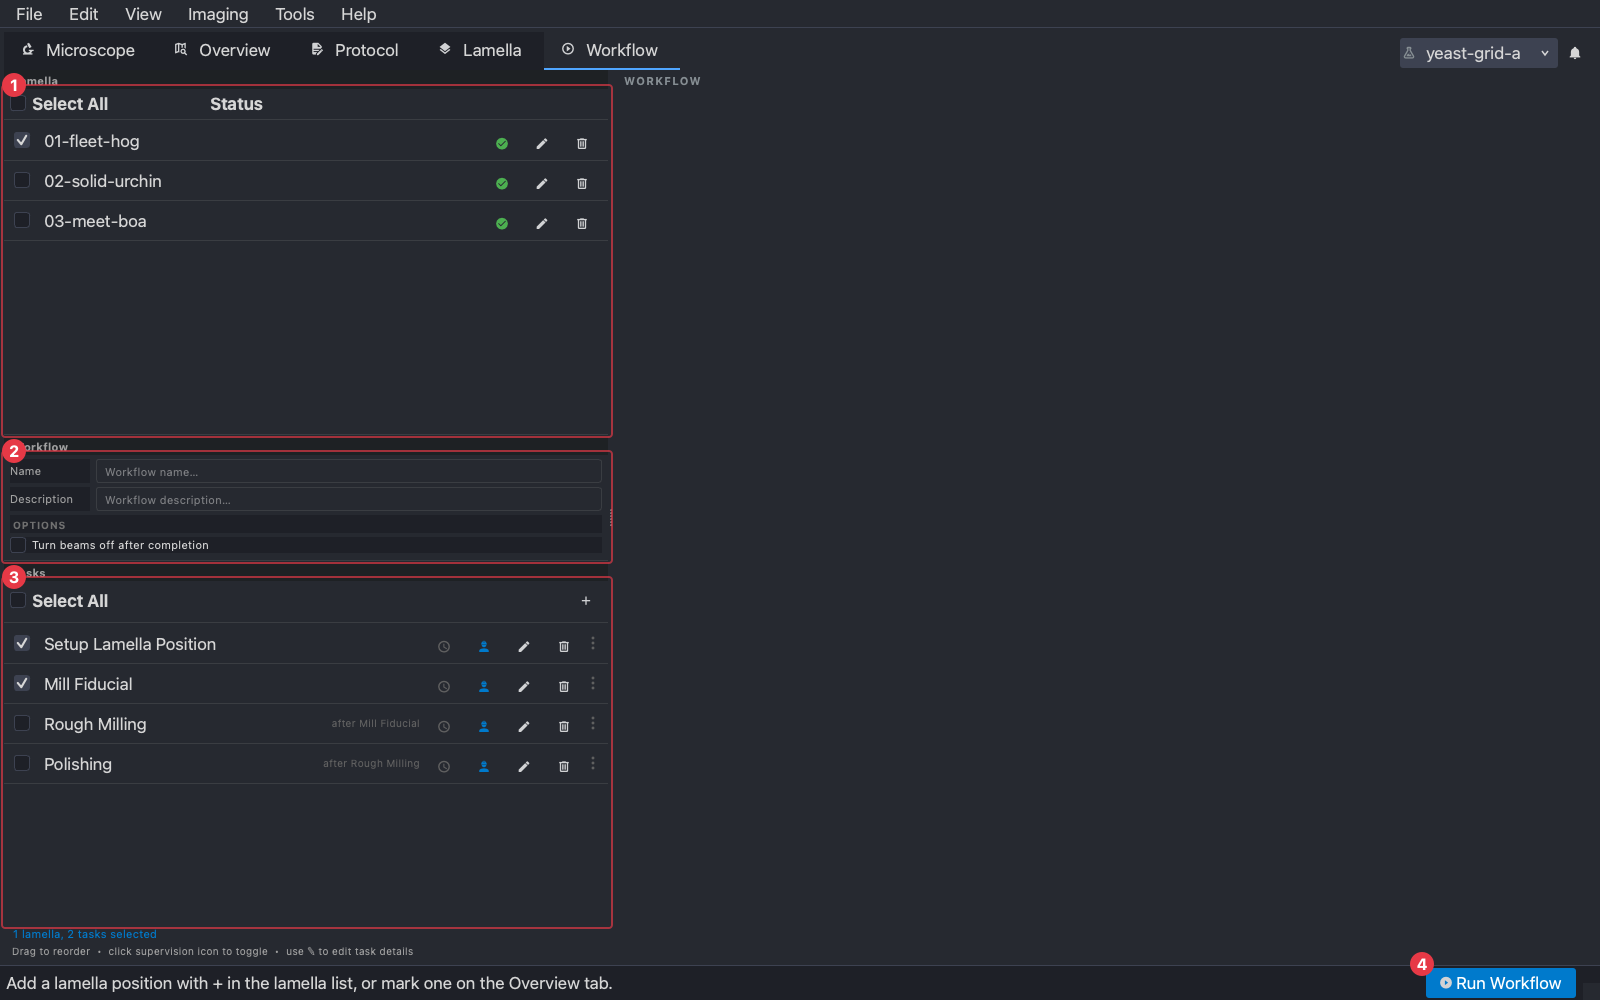
- (1) The lamellae, each with a checkbox. Tick the ones this run is for.
- (2) The workflow’s name and description, and its options, such as turning the beams off when the run completes. All saved in the protocol.
- (3) The tasks, in the order they run. Tick the ones this run is for. Drag a row to reorder; + adds a task from the protocol.
- (4) Run Workflow: every ticked task, for every ticked lamella.
A task row carries the settings the workflow section of the protocol holds:

- (1) Selected for this run.
- (2) Scheduled: when this task should run, if it is not simply next.
- (3) Supervised. Blue means the task stops and asks at its decision points; grey means it runs through on its own.
- (4) Edit the task’s workflow settings, including which tasks it requires to have run first; (5) remove it from the workflow.
The grey text on a row, “after Mill Fiducial”, is its requirement: a task does not run on a lamella whose required tasks have not completed. The summary under the list says how many lamellae and tasks are selected.
2. Run
Press Run Workflow. A dialog lists what is about to run, on which lamellae, with a time estimate, and asks you to confirm. The run then goes lamella by lamella and task by task: for each selected task in order, for each selected lamella in order. The status bar shows the current task and lamella and a count, the window’s border changes colour, and the tab you were on stays put.
The workflow moves the stage between lamellae and to the milling angle, runs alignments, images and mills, and writes every image and result into the lamella’s folder as it goes. Nothing needs saving.
3. Supervision
When a supervised task reaches a decision, the run stops and asks. The Attention Required button lights up in the status bar:
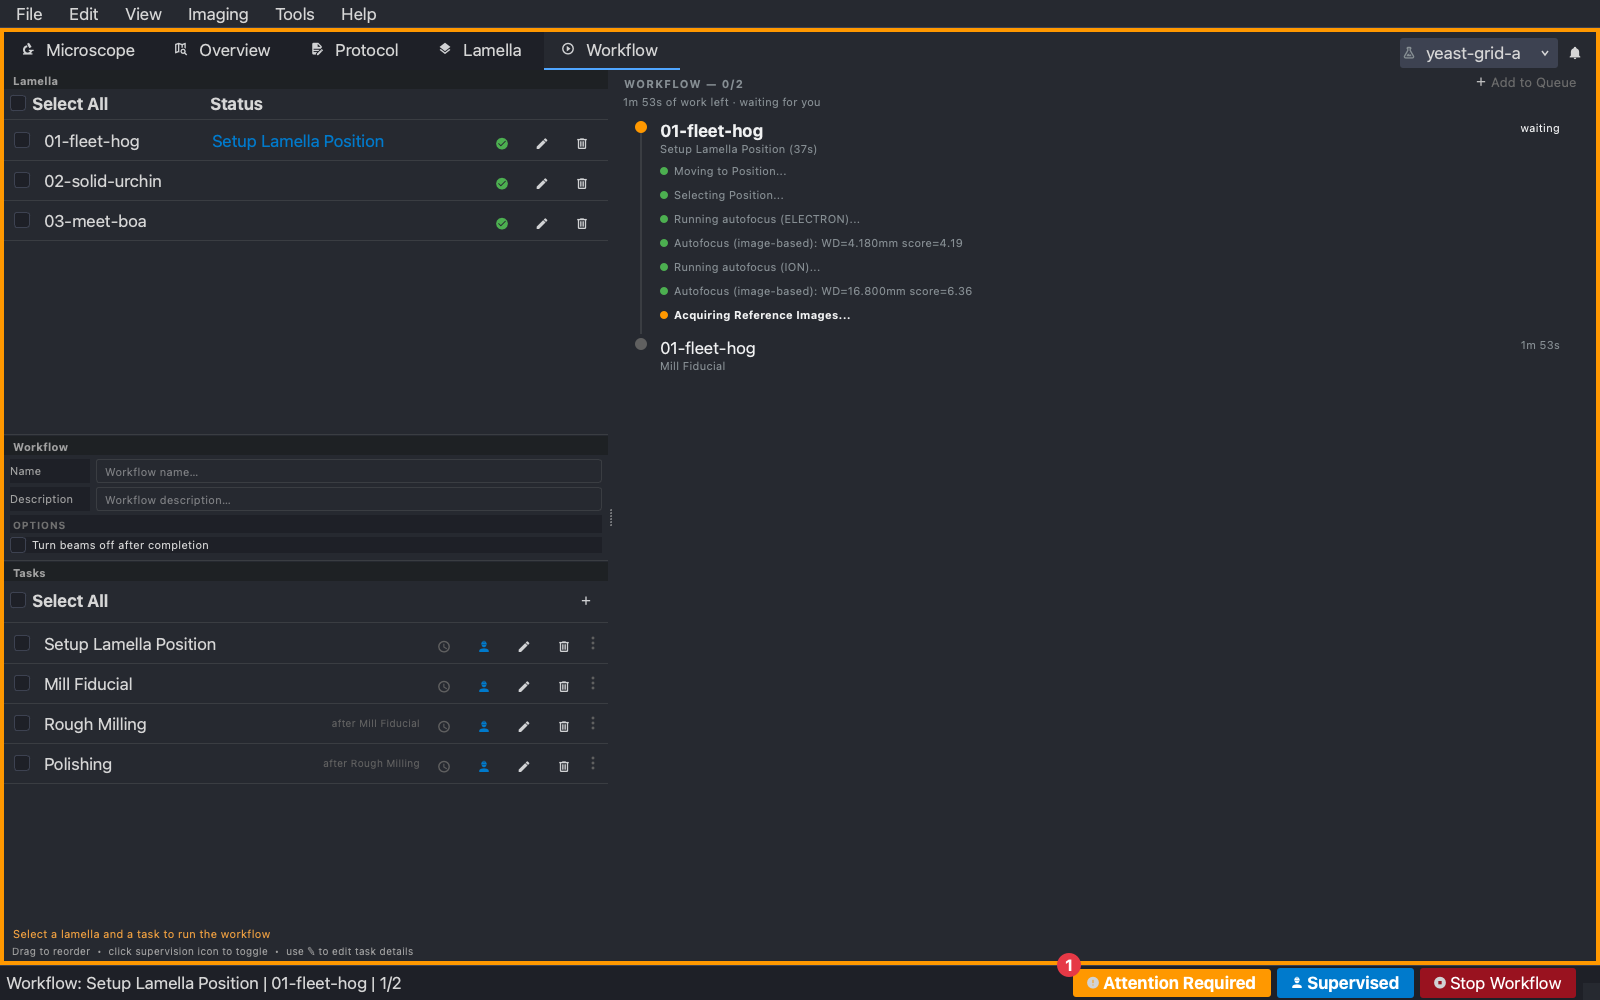
Press it, or open the Experiment tab under Microscope, to see the question. The question is in the line above the buttons, and the buttons are what it offers. Setup Lamella Position, for instance, asks before tilting:
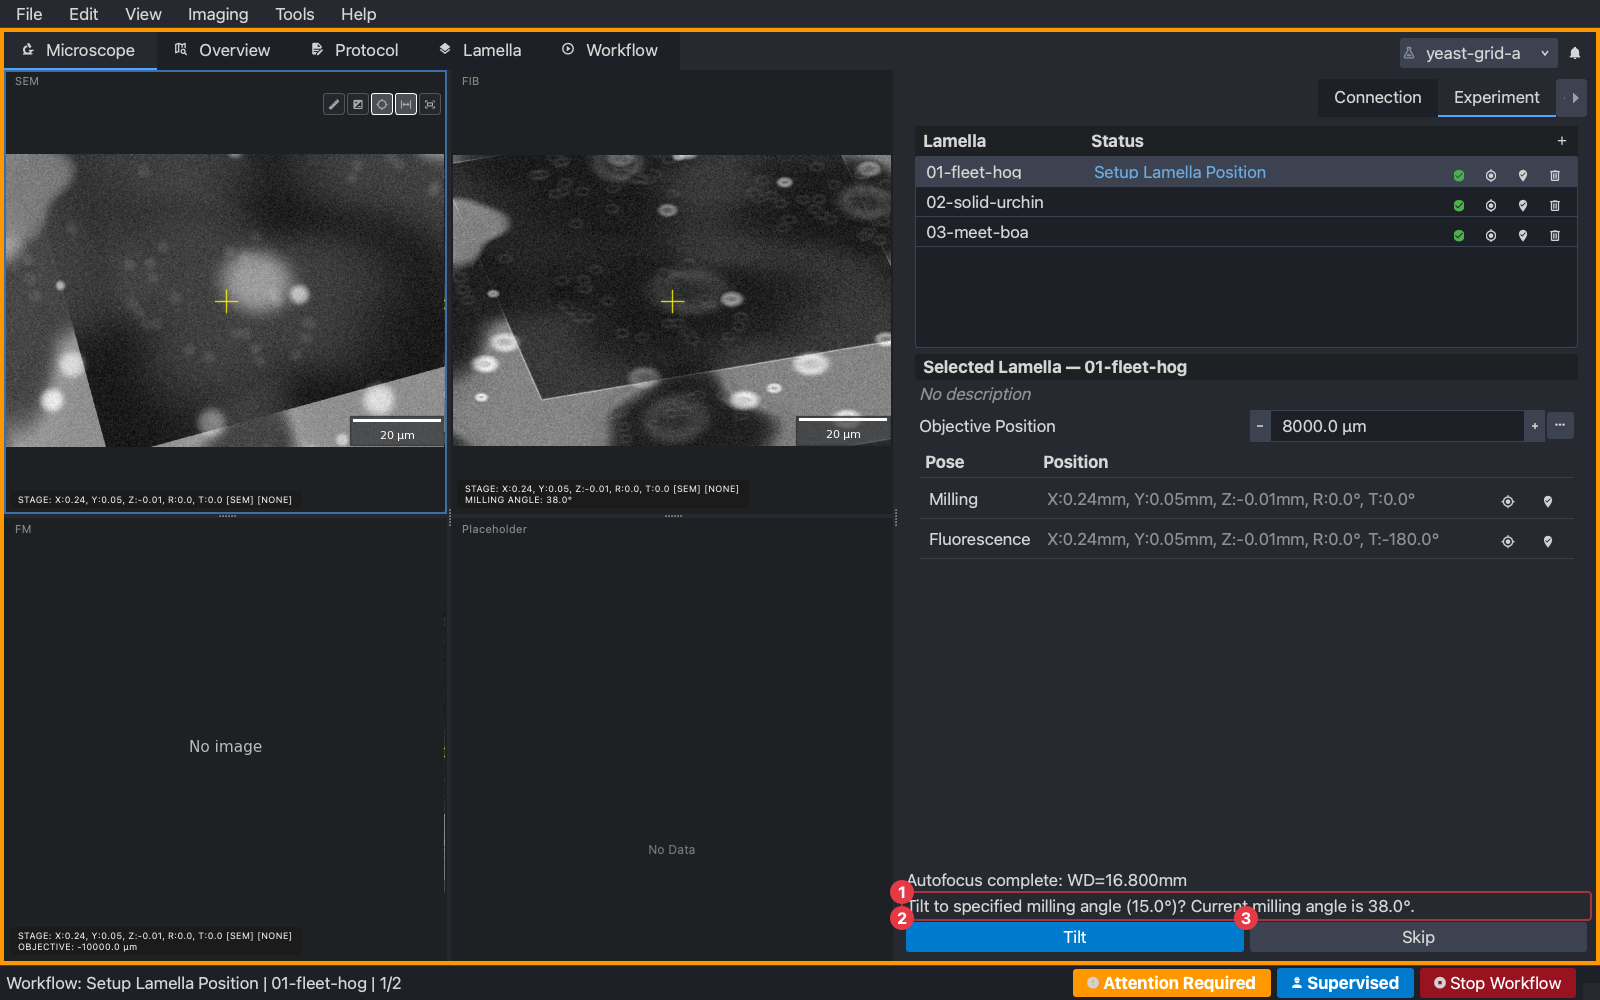
- (1) The question.
- (2) Yes, under the name of the action, here Tilt.
- (3) No, here Skip.
While the run is waiting, the microscope is yours: image, move the stage, adjust the objective, change what you need to, then answer. Some questions have only one button, Continue, and are there so you can check something first, such as double-clicking the feature to centre it.
A milling task asks differently. Its patterns are put on the FIB view and the Milling tab for you to move or edit, and the question offers Run Milling and Continue:
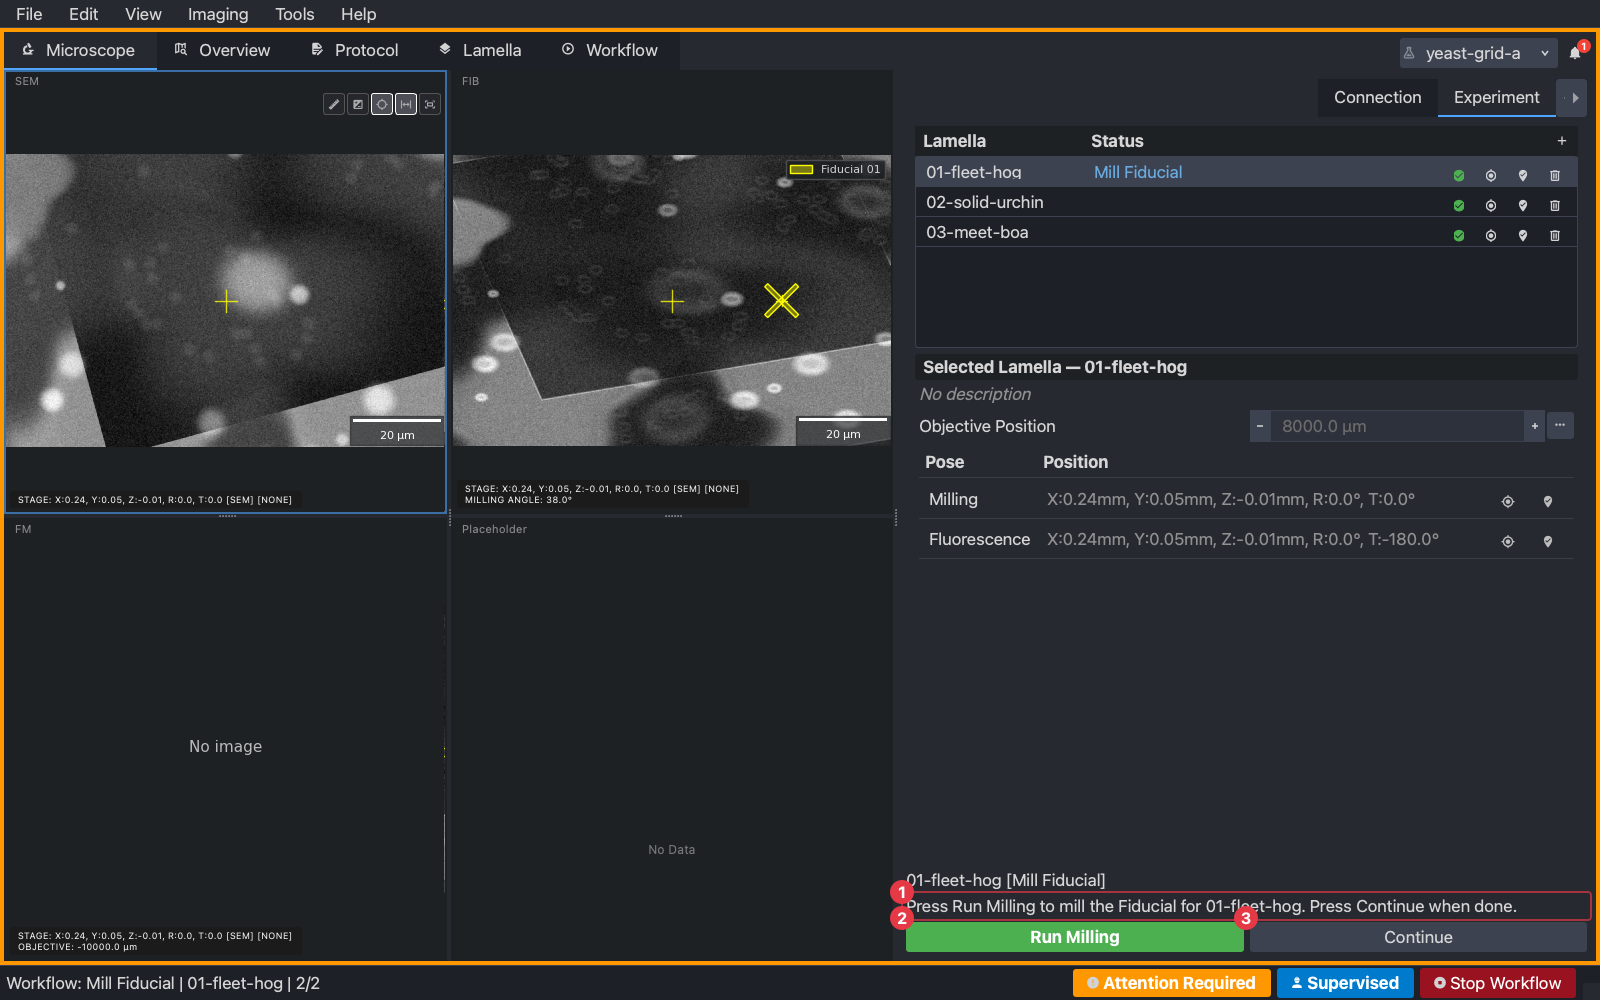
Run Milling mills what is shown, then asks the same question again, so you can inspect the result, adjust, and mill again. Continue accepts the result and moves on. Mill Fiducial then asks you to check the alignment area, the dashed box on the FIB view that later tasks align to: drag its corners if it should cover something else, and press Continue.
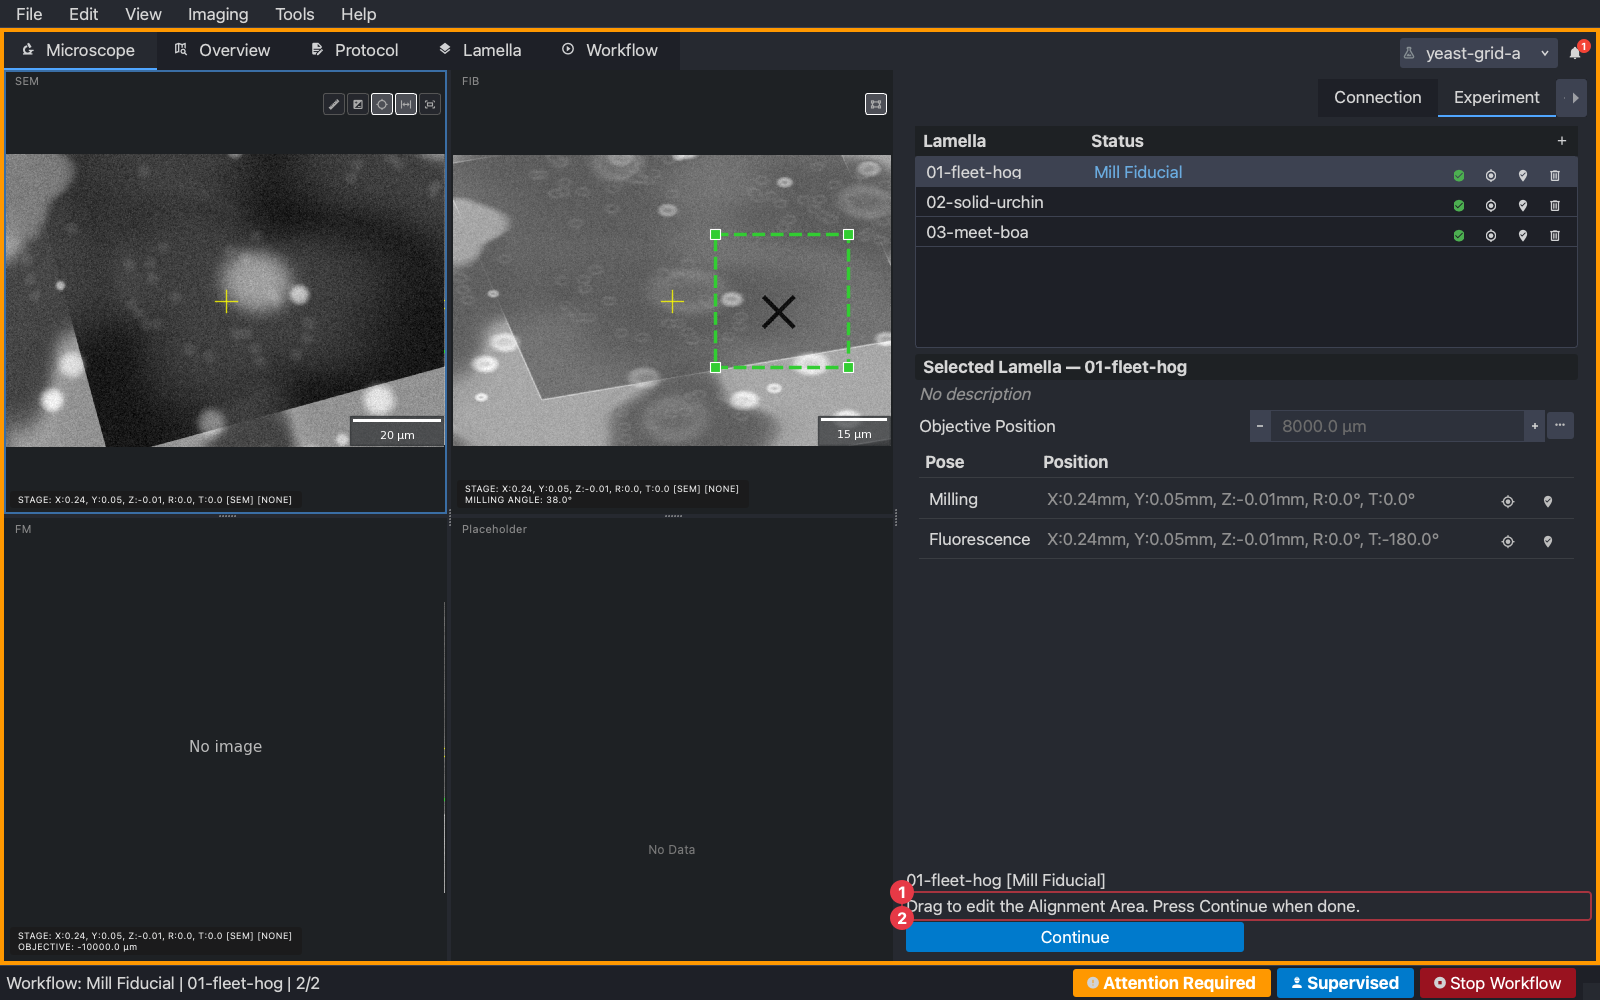
The Supervised badge in the status bar shows the run’s mode; the same questions are answered automatically in an unsupervised run.
4. The queue
While a run is going, the right side of the Workflow tab shows the queue: every lamella-and-task pair the run will do, in order, with the one in progress, the ones done, and the ones still to come.
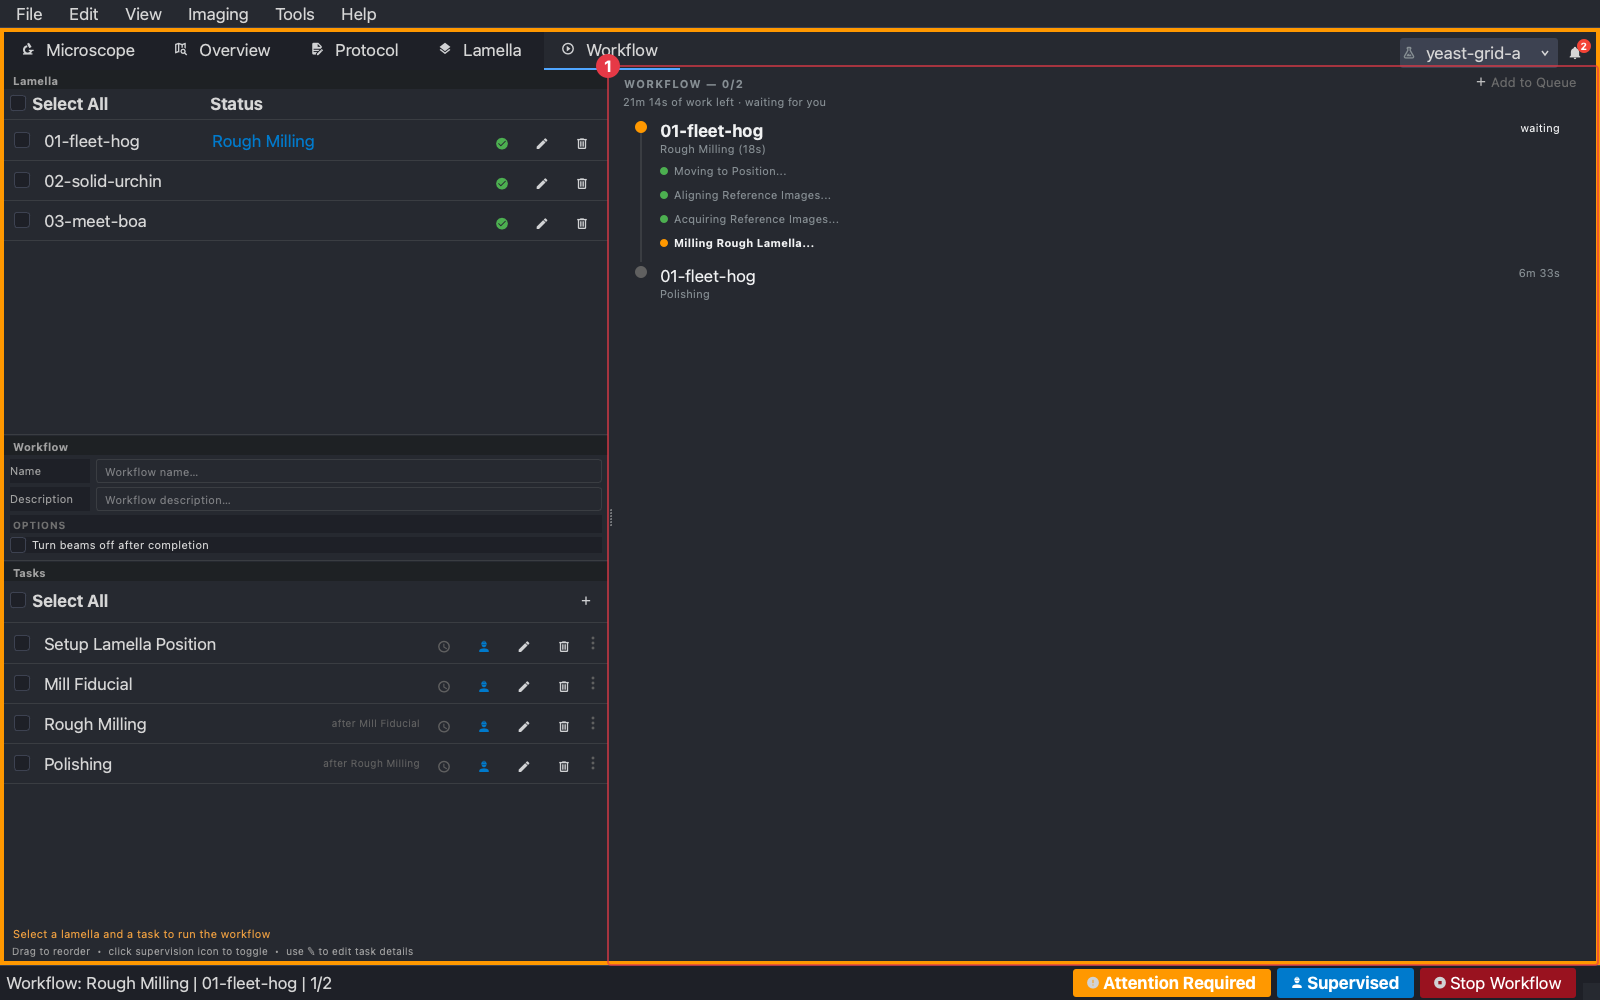
The queue can be changed while it runs. Right-click an item for its actions:
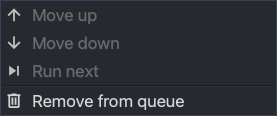
- Move up and Move down shift a pending item one place; Run next brings it to the front. Only items that have not started can move.
- Remove from queue drops a pending item. The lamella records the task as removed, not failed, and it can be queued again later.
- Run again, on a finished item, queues the same task on the same lamella once more. This is how a task is re-run: after adjusting a pattern on the Lamella tab, say, or after a milling result you are not happy with.
- Stop task, on the item in progress, stops that task only. It is marked cancelled and the run carries on with the next item.
To add work to a running queue, tick lamellae and tasks on the left as usual and press Add to Queue at the top of the queue. A dialog shows what is being added, what is already queued, whether it runs next or at the end, and how much time it adds. The queue’s header says how much work is left and whether it is waiting for you.
5. Stopping
Stop Workflow in the status bar stops the whole run. The task in progress is brought to a safe stop, the beams are set back to their imaging settings, and the lamella it was working on records the task as cancelled rather than failed. Nothing already done is lost: the lamellae keep their state, and a later run picks up from the tasks that have not completed.
6. Afterwards
When the run ends a summary lists every task it ran, per lamella, with its outcome and how long it took.
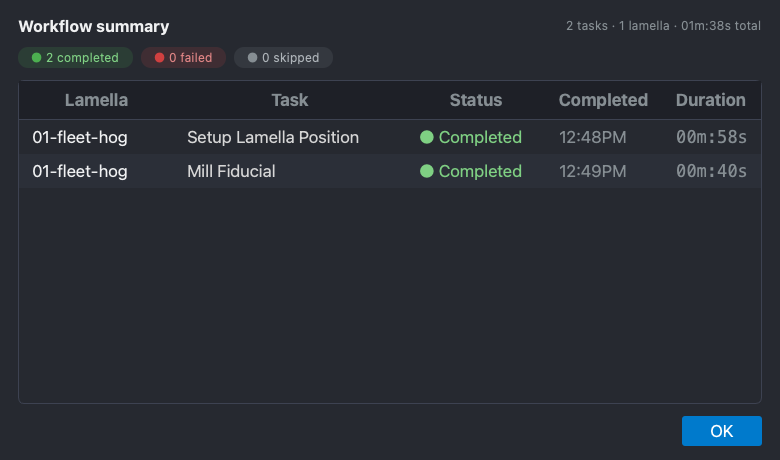
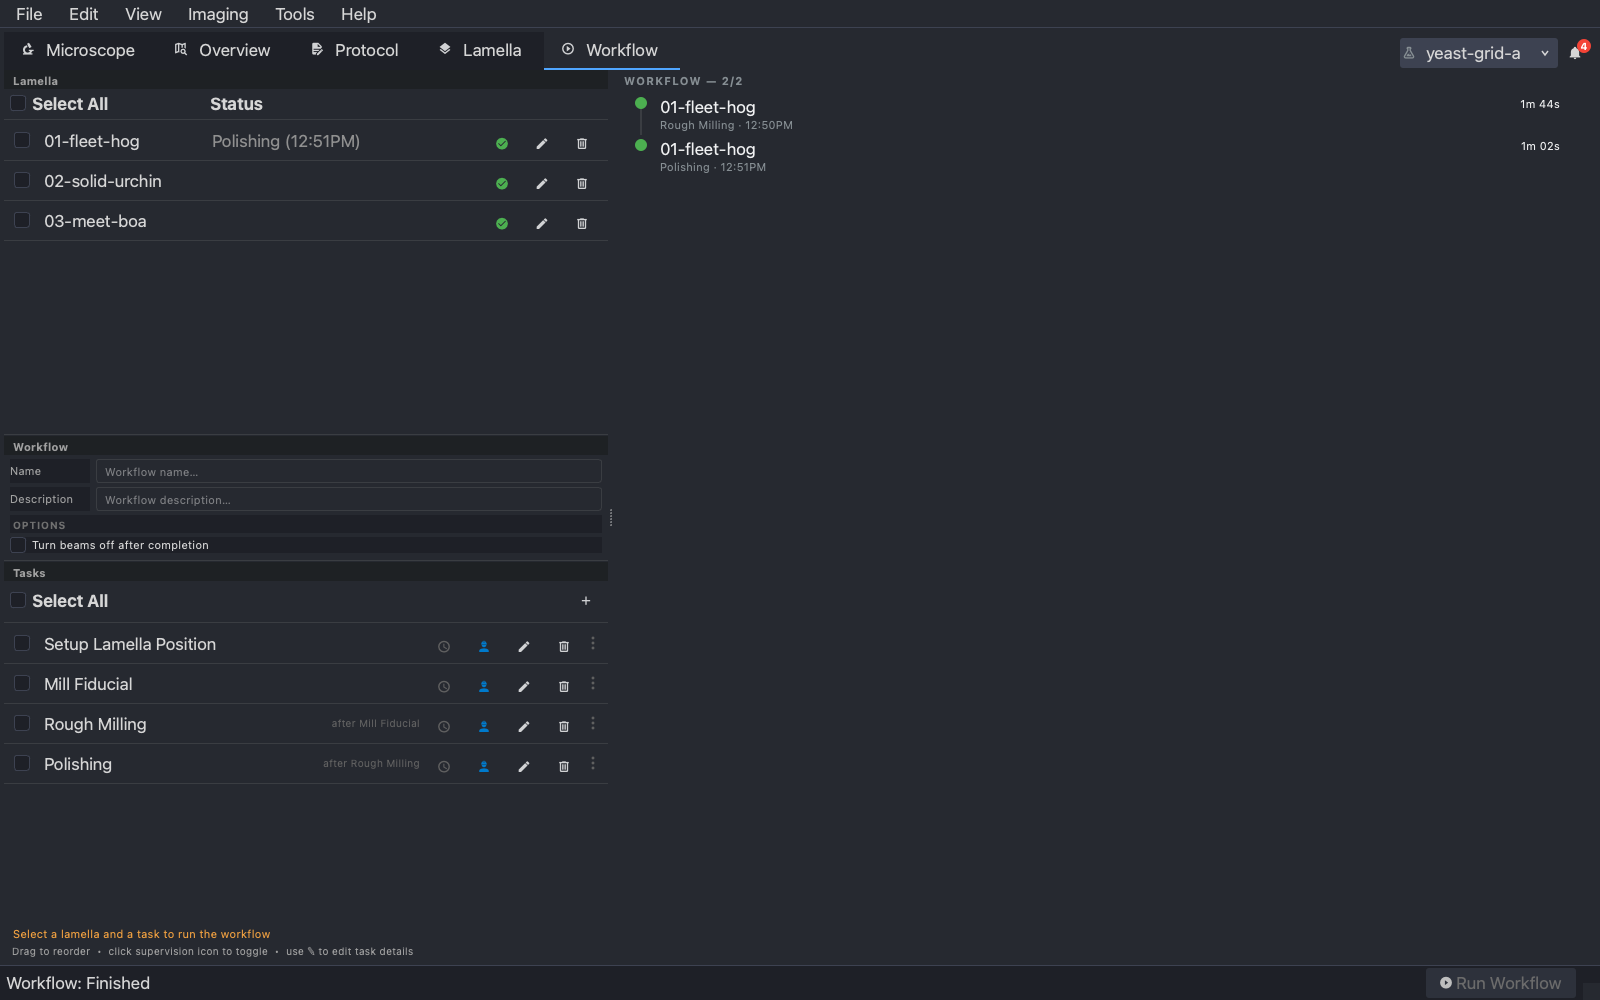
Each lamella’s status shows its last task, and the Lamella tab’s Review shows what every task did. Tasks that failed are marked so, and you decide with the defect mark whether a lamella is worth continuing. Select the next tasks and run again; a task whose requirement has not completed on a lamella is skipped for that lamella and says so.
Next
Your first lamella pulls the section into one run, if you have not read it yet.