Tasks
By the end of this page you know what each task does, what it asks you when it is supervised, and which tasks in which order to start with.
A task is one step done to one lamella: move there, image, mill, ask. A workflow is a list of tasks in order, run for every selected lamella. The tasks below are the ones fibsemOS ships; plugins can add more, and they appear in the same lists.
Adding a task to a protocol
On the Protocol tab, + above the task list opens the Add Task dialog: pick a type and give the task a name. The name is what the workflow refers to, so a protocol can have two tasks of the same type, such as two milling tasks at different currents.
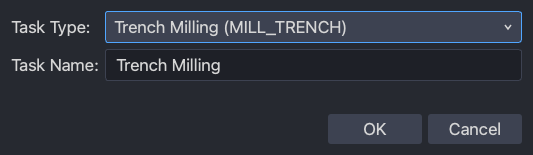
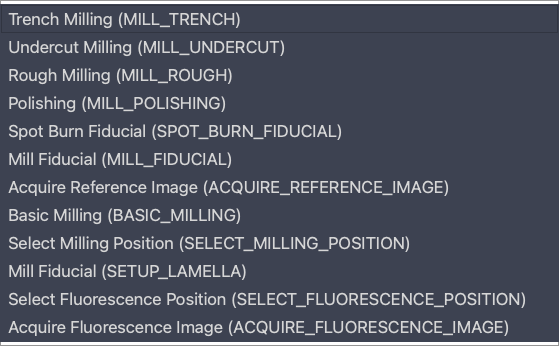
Every task has the same three things in common on the Protocol tab: its own parameters, a reference-image acquisition after it runs (which beams, at which fields of view), and the imaging settings those images use. Milling tasks add the milling task editor.
The tasks
Select Milling Position
Sets up a lamella for milling. Aligns the beams’ coincidence at the lamella, tilts to the milling angle, and records the milling position. The milling angle is set here; the Movement page explains it.
Supervised, it asks you to confirm the tilt, then to double-click the feature in the FIB image to put the milling position on it, and, if select point of interest is on, to click the point of interest that the patterns are linked to. Options: the milling angle, automatic milling alignment (align the coincidence at the current pose, then tilt), autofocus before moving, and whether to ask for a point of interest.
Mill Fiducial
Mills a fiducial mark beside the lamella and records an alignment area around it. Later tasks align their images to this mark before milling, so drift and the shift between beam currents do not move the patterns. Options: how far the alignment area is expanded around the fiducial, and whether to align to a reference image before milling it.
Supervised, it pauses before milling with the fiducial pattern on the FIB image so it can be moved.
Rough Milling
The bulk of the material comes off here: the trenches above and below the lamella at high current, in the stages the protocol defines, with the stress-relief cut. Options: keep the polishing position synchronised with the rough-milling position (recommended), link the patterns to the point of interest so they follow it if it is updated, and re-acquire the alignment reference after milling.
Supervised, it pauses before milling with the stages’ patterns on the FIB image.
Polishing
The final thinning at low current, to the lamella’s finished thickness. Option: link the patterns to the point of interest. Supervised, it pauses before milling, as Rough Milling does.
Trench Milling and Undercut Milling
Used for waffle milling. Not yet available.
Acquire Reference Image
Takes reference images of the lamella at a chosen orientation, with an optional filename. Useful between milling tasks, or at the end, to record the result.
Basic Milling
Moves to the lamella, runs its milling task, takes reference images. The simplest milling task: a milling stage with no assumptions about what it is for.
Spot Burn Fiducial
Burns spot fiducial marks at given coordinates for correlation with fluorescence. Options: the milling current, the exposure per spot, autofocus first, and the coordinates. Supervised, it asks you to place the spots.
Select Fluorescence Position and Acquire Fluorescence Image
On an Arctis: the first moves to the lamella’s fluorescence position and lets you set the objective; the second takes a fluorescence image or z-stack there with the channels, z-stack and autofocus settings given, and retracts the objective afterwards unless told not to.
Supervision
Every task can run supervised or not; the choice is per task on the Workflow tab. A supervised task stops at the points above and asks on the Experiment tab, with the question in the status line and Yes and No below it, or with the patterns shown for adjusting and a Run Milling button. While it waits, the microscope controls are yours: you can image, move and change patterns before pressing Continue. An unsupervised task makes the same decisions itself and only stops if something fails.
A recommended starting workflow
The shipped on-grid protocol is the place to start, and its workflow is the one to run first:
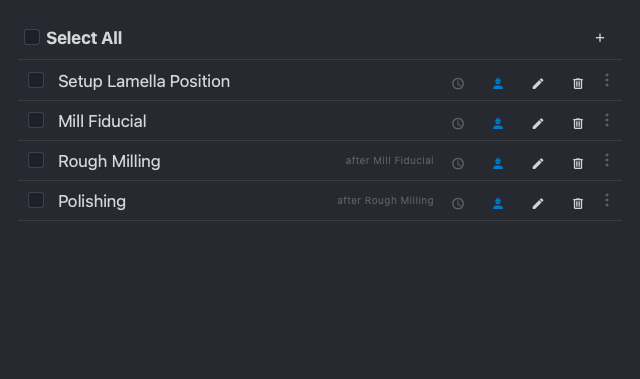
- Setup Lamella Position
- Mill Fiducial
- Rough Milling, after Mill Fiducial
- Polishing, after Rough Milling
For your first grids, run all four supervised. You will see every decision the tasks make and can correct the pattern placement before any milling. Once the positions and patterns are landing where you expect, turn supervision off for Rough Milling and Polishing first: they are the long ones, and the ones an unattended run is for. Keep Setup Lamella Position supervised until you trust the coincidence alignment on your instrument.
Run Setup Lamella Position and Mill Fiducial for every lamella before any rough milling, so a problem with a position is found while it is cheap to fix. The Workflows page is how to select tasks and lamellae and run them.
Next
Workflows: selecting lamellae and tasks, running, supervising, and stopping.