Protocols
By the end of this page you know what a protocol holds, which shipped one to start from, and how to change a task’s settings on the Protocol tab and push the change to lamellae that already exist.
Before you start
- An experiment is open. The Protocol tab edits the experiment’s own copy of the protocol.
What a protocol is
A protocol is a file that says how lamellae are made: which tasks are run, with what settings, in what order, and a few options for the whole run. It has three sections.
- Tasks: one entry per task, with its type and its settings. A milling task’s entry holds its milling stages, patterns and currents, the same things the Milling page set up by hand; a positioning task’s holds the milling angle; every task has its reference-imaging settings.
- Workflow: the order the tasks run in, and for each whether it is required, whether it is supervised, and which tasks must have run before it. This is edited on the Workflow tab.
- Options: settings for the whole run, such as turning the beams off at the end.
When an experiment is created the chosen protocol is copied into the
experiment folder as protocol.yaml, and that copy is what the experiment
runs with and what the Protocol tab edits. Every change is saved to it as
you make it. The original file is not touched, so the same shipped protocol
can start many experiments.
Which one to start from. The shipped on-grid protocol (task-protocol)
is the default, with four tasks: set up the lamella position, mill a
fiducial, rough milling, polishing. Its currents are Thermo Fisher ones and
its milling angle 15°; on an Arctis or a Tescan start from it too, then set
the currents and the milling angle on the Protocol tab to what the
instrument uses. A waffle-method protocol ships beside it but is not yet
available for use. Protocols
from earlier versions of AutoLamella are converted with the Legacy
button when the experiment is created.
1. The Protocol tab
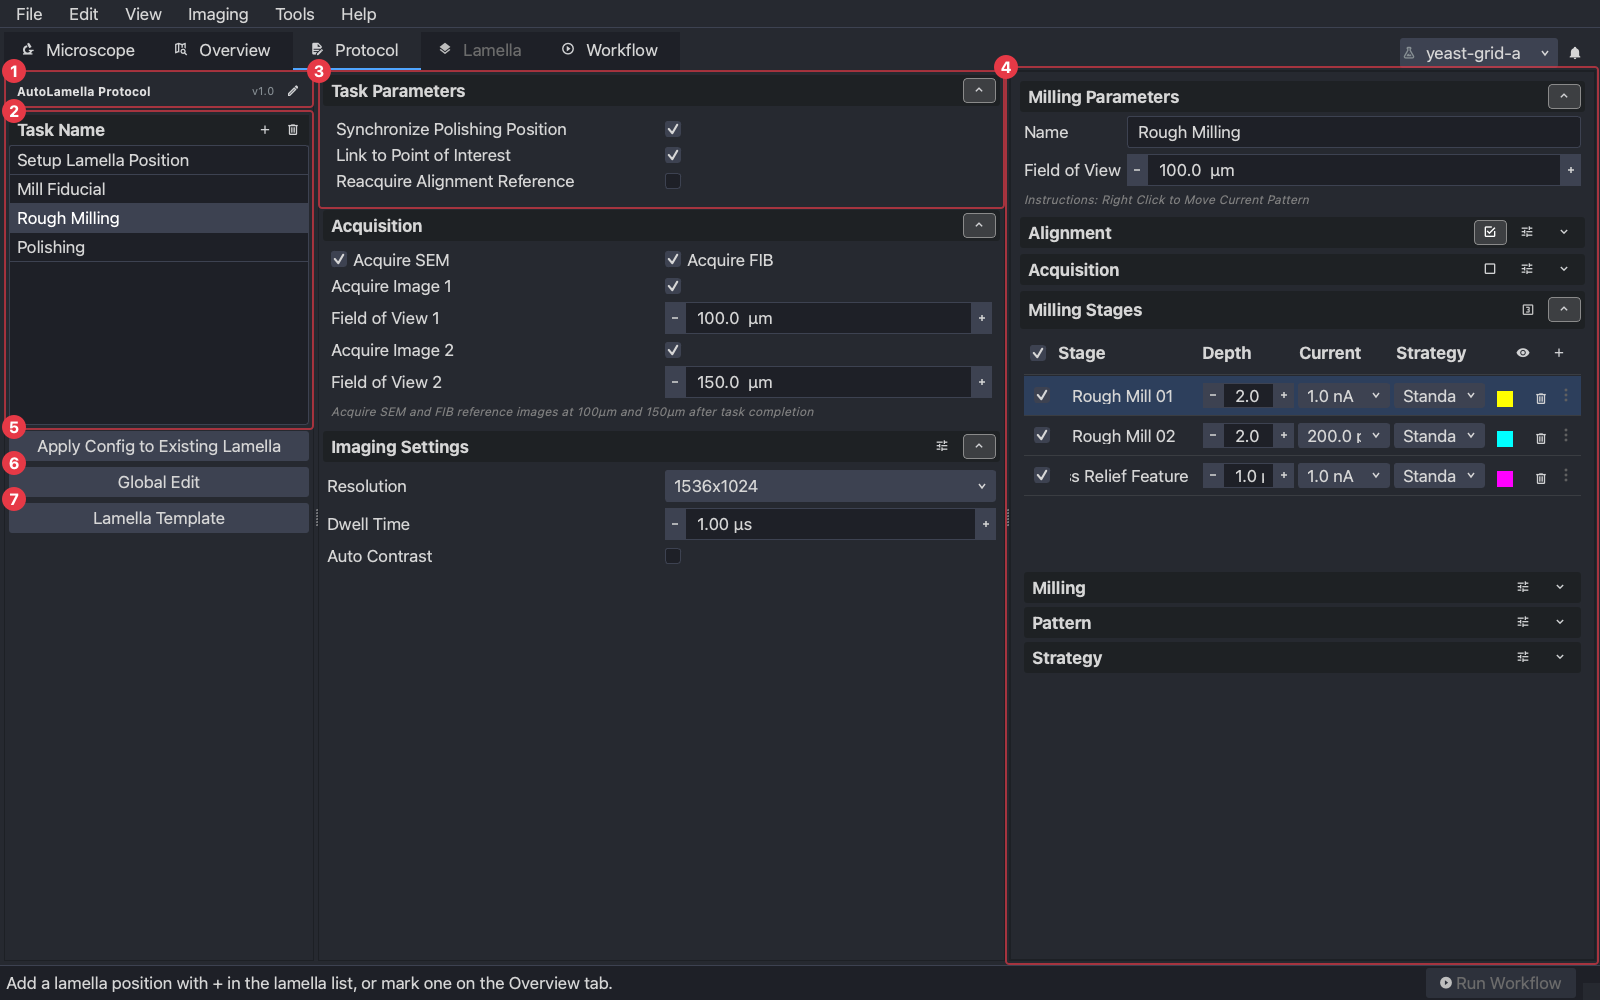
- (1) The protocol’s name and version. The pencil edits its name and description.
- (2) The task list. Click a task to edit it; + adds a task of a chosen type and name, the bin removes the selected one. Adding or removing here changes what tasks exist; the order they run in is set on the Workflow tab.
- (3) The selected task’s own parameters, its reference-image acquisition (which beams, at which fields of view, after the task) and the imaging settings those images use. What appears here depends on the task type.
- (4) For a milling task, the milling task editor: the same stages, patterns, alignment and acquisition as the Milling tab, editing this task’s copy. Rough milling here is two stages at falling currents plus a stress-relief cut.
- (5) Apply Config to Existing Lamella: see below.
- (6) Global Edit: change reference imaging and the milling field of view for many tasks at once.
- (7) Lamella Template: defaults every new lamella starts with, such as its alignment area and point of interest.
Changes take effect for lamellae added after the change. Each lamella carries its own copy of the task configuration from the moment it is created, so editing the protocol does not reach into lamellae that already exist unless you ask it to.
2. Apply a change to existing lamellae
Press Apply Config to Existing Lamella after editing a task. Every lamella’s copy of that task is replaced with the protocol’s, for the parameters, imaging and milling settings. The one thing it leaves alone is where each lamella’s patterns sit: a pattern that was placed on a lamella stays placed. Lamellae you have edited individually lose those edits for the task you applied, so apply before fine-tuning individuals, not after.
3. Global Edit
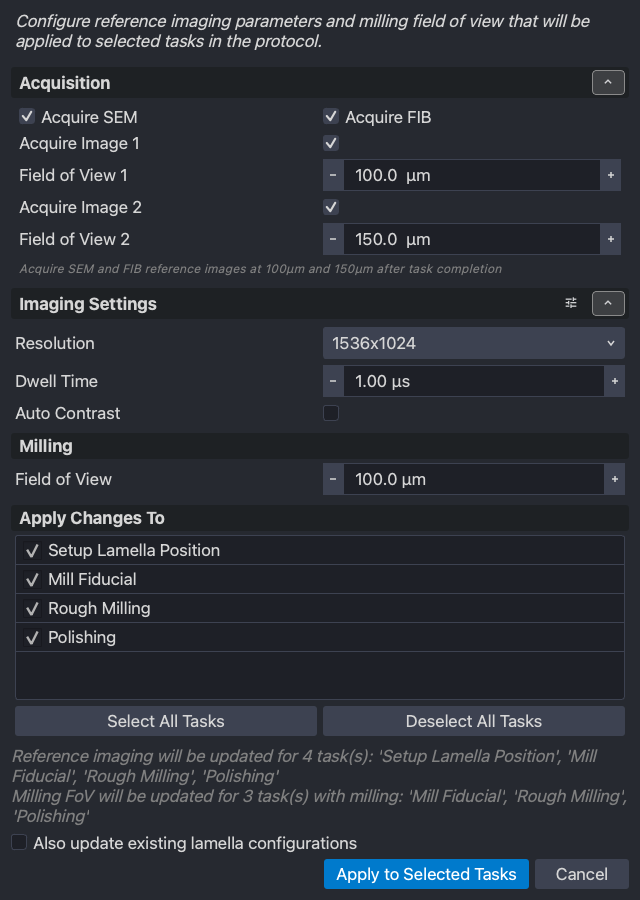
One dialog to set the reference-image acquisition, the imaging settings and the milling field of view for a set of tasks at once, which is how a protocol is moved to a different magnification without visiting every task. Tick the tasks it should apply to; the note says which will change. Tick Also update existing lamella configurations to push it into the lamellae that exist as well.
4. Saving, loading and sharing
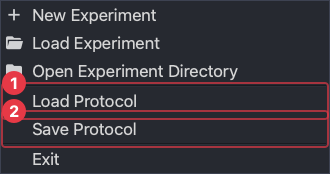
The experiment’s protocol saves itself, so there is nothing to do to keep your changes. File → Save Protocol (2) writes a copy elsewhere, for reuse in another experiment or to hand to someone; File → Load Protocol (1) replaces the experiment’s protocol with a file, for when the one chosen at creation was wrong. Loading does not change lamellae that already exist, for the reason above.
Next
Overview acquisition: image the grid and mark where the lamellae go.